How to Add A Group In Facebook
By
Dany Firman Saputra
—
Friday, March 27, 2020
—
Create Facebook Group

Groups are implied to be a close circle of people who share and also communicate on Facebook.
People have a tendency to create them around things like:
- Topics
- Books (think of it like a book club).
- Their business (sort of like an "expert's club").
- To sell items locally.
- Exclusive membership site.
- Support groups.
There is no "Wrong" subject for a group IMHO. It all relies on your:.
- Goals.
- Focus.
- Business.
- Topic.
As soon as you figure out why you intend to utilize one as well as how it will assist promote as well as sustain one or several of the above, it's time to develop your very own Facebook Group. And it's easy!
How To Add A Group In Facebook
1. Find "Add Group".
From your "homepage" on Facebook go to the Explore - Groups area on the left side food selection and click on, "Groups."
As soon as you get there, it will resemble this:.

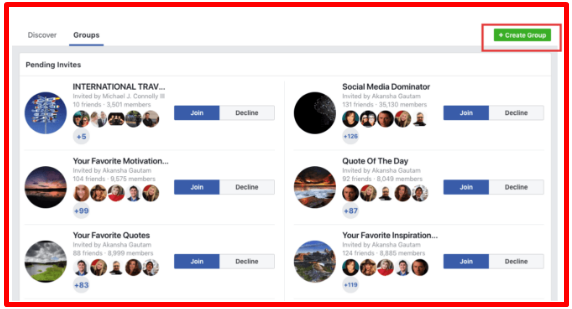
2. Click "Create Group".
You'll be required to a page that displays the choice to develop a group along with revealing you some:.
- Pending Invites.
- Favorites.
- Your Groups.
- Groups You Manage.
To begin the procedure of creating a Group, click "Develop Group" in the top right-hand man corner.
>> Facebook also offers an alternate way to create a new group
Right of your name and the notices bell in the right-hand man corner, click on the drop down and also choose, "Create Group."

As soon as you pick that option, a lightbox will certainly open where you can start to add your Facebook Group details.

3. Name Your Group.
The first thing you require to do is give your Group a name-- I'm calling my Group "Scott Secret Group".
This name can be whatever you desire and you can alter it later on. But attempt to make the Group name unforgettable and searchable-- so individuals can discover it.

4. Add Members.
Facebook does something strange here-- and also out of whack, in my viewpoint.
You're in fact needed to add at the very least 1 buddy to the Group before you can produce it. If you do not you get the mistake message listed below:.

So in order to develop your group, you'll require to add at the very least 1 buddy to the group.
5. Choose Privacy Setting.
You'll currently need to make a decision what privacy setting you want your group to have.
This is possibly one of the most crucial choice you'll make while creating your group-- as there are some limitations to transforming later on.

If you have less than 5000 participants you'll have the ability to transform the settings as you choose.
However as soon as your Groups grows to over 5000 participants, you can just change an Open Group to Shut or Secret-- and also a Closed Group to Secret.
You won't have the ability to transform the privacy once again after this.
There can be confusion regarding what personal privacy establishing a Group must have-- Open, Closed or Secret.
It's fairly self explanatory as seen above-- but below's an additional wonderful visuals from Facebook to break it down:

6. Click Create.
After you select your personal privacy setting, click the "Create" button as you have actually seen in previous photos:.

7. Add Your Cover Image.
Facebook will certainly now offer you the option to include your imaginative visuals for your header or cover picture.
This is totally up to you and also need to be straightened with your current brand or the theme of your group.

However if you have actually produced numerous Groups or have several groups in your faves, you'll intend to choose an image that separates each of them.
Remember: the dimensions for this cover photo are different from those on your individual Timeline or organisation Page.
You want to utilize 1640 x 856 pixels for your group cover photo.
8. Complete "About" Section.
Your regarding area is essential for 2 factors:.
- Gives possible members a suggestion what your Group is about.
- Can display any type of "rules" you might have concerning the Group.
So load it out as you please-- viewing as this is YOUR Group.
10. Edit Group Settings.
Next you'll want to edit the Group setups.
You do this by clicking the "More" tab and afterwards clicking "Edit Group Settings":

As soon as on the edit page, you'll have many options to alter:

Items you can change:.
- Group Name.
- Group Type.
- Description.
- Tags.
- Locations.
- Linked Pages.
- Privacy Settings.
- Membership Approval-- Do you intend to let anybody include members or should only you be able to?
- Set a Group Address-- Right here you'll have an opportunity to offer the Group a custom url in addition to an email address where individuals can email the Group directly.
- Change your Description.
- Change Posting Permissions-- Here you can make a decision so admins can upload or if participants can too.
- Post Approval-- You can need that all blog posts be accepted by an admin before going live.
As soon as you're done and also pleased with the setups, click "Save1".
Your Group is Ready to Go!
You have actually now efficiently produced a Facebook Group! Congrats!
Now you can upload updates inside the Groups-- and so can members (if you've allowed it).
A Couple Of Group Features to Explain.
Notices- As an admin you must most likely turn the notices on to receive all updates when anyone posts-- just in case a person spams the Group & you intend to respond promptly:.

Messages/Chat- One of the excellent aspects of groups is you can launch a Group chat/message with either all participants of a group or select participants.
This is especially helpful when you have a statement to make or need to swiftly work together on an item/issue.
Events- A function possibly not utilized commonly sufficient in Groups is Events. Inside the group you can develop events that just members can see & RSVP for.
Simply click on the "Events" tab to the left and after that "Produce Event" & the lightbox below will fill to develop your event.
Files- Inside groups you can share data of any kind along with produce Files which Group members can include in & collaborate on.
Think about this as your very own little workspace within Facebook-- or maybe a substitute for apps like Basecamp or Dropbox.
Last Thoughts
Since you have actually read this post, ideally you can now efficiently develop a Group by yourself.
On a future post I'll discuss whether you ought to have a Facebook Profile, Web Page or a Group for your company... or perhaps every one of the above!