How to Create A Facebook Group
By
Dany Firman Saputra
—
Tuesday, May 28, 2019
—
Create Facebook Group

Groups are suggested to be a close circle of individuals who share and also communicate on Facebook.
People tend to produce them around things like:
- Topics
- Books (think about it like a publication club).
- Their business (kind of like an "insider's club").
- To sell items locally.
- Exclusive membership site.
- Support groups.
There is no "Wrong" topic for a Group IMHO. Everything relies on your:.
- Goals.
- Focus.
- Business.
- Topic.
Once you figure out why you intend to use one and how it will certainly assist advertise as well as support one or numerous of the above, it's time to produce your very own Facebook Group. As well as it's very easy!
How To Create A Facebook Group
1. Find "Add Group".
From your "homepage" on Facebook most likely to the Explore - Groups section on the left side food selection and also click on, "Groups."
As soon as you arrive, it will certainly look like this:.

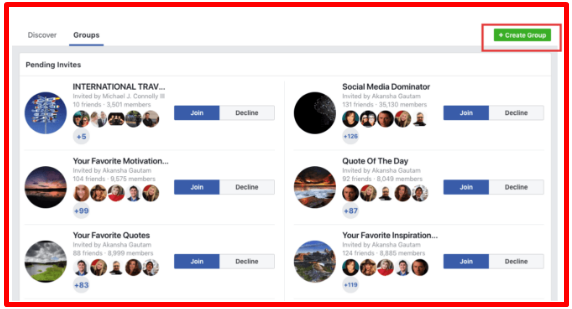
2. Click "Create Group".
You'll be taken to a page that displays the choice to develop a group as well as revealing you some:.
- Pending Invites.
- Favorites.
- Your Groups.
- Groups You Manage.
To start the process of developing a group, click "Develop Group" in the top right-hand man corner.
>> Facebook also offers an alternate way to create a new group
Right of your name as well as the notices bell in the right-hand man corner, click on the drop down as well as select, "Create Group."

Once you select that option, a lightbox will certainly open up where you can start to include your Facebook group details.

3. Name Your Group.
The first thing you need to do is provide your group a name-- I'm calling my group "Scott Secret Group".
This name can be whatever you desire as well as you can alter it later on. However try to make the Group name memorable and searchable-- so people can find it.

4. Add Members.
Facebook does something strange right here-- and also out of order, in my viewpoint.
You're in fact required to include a minimum of 1 pal to the group before you can develop it. If you don't you get the error message listed below:.

So in order to produce your Group, you'll require to include at least 1 buddy to the Group.
5. Choose Privacy Setting.
You'll currently need to choose what privacy setting you want your group to have.
This is possibly one of the most essential choice you'll make while developing your group-- as there are some limitations to transforming down the road.

If you have fewer than 5000 participants you'll be able to change the settings as you please.
However as quickly as your groups expands to over 5000 participants, you can just change an Open Group to Shut or Secret-- and a Shut Group to Secret.
You will not be able to alter the privacy again hereafter.
There can be confusion regarding what privacy establishing a group needs to have-- Open, Closed or Trick.
It's relatively self informative as seen above-- but below's an additional excellent visuals from Facebook to simplify:

6. Click Create.
After you choose your personal privacy setting, click the "Create" switch as you've seen in previous images:.

7. Add Your Cover Image.
Facebook will now provide you the alternative to add your imaginative graphic for your header or cover image.
This is completely approximately you as well as ought to be aligned with your current brand or the motif of your group.

However if you've produced lots of groups or have numerous groups in your favorites, you'll want to pick an image that differentiates each of them.
Keep in mind: the dimensions for this cover photo are various from those on your personal Timeline or company Page.
You wish to utilize 1640 x 856 pixels for your group cover image.
8. Complete "About" Section.
Your concerning area is essential for 2 reasons:.
- Provides prospective participants a concept what your group is about.
- Can display any kind of "guidelines" you might have regarding the group.
So fill it out as you please-- viewing as this is YOUR group.
10. Edit Group Settings.
Following you'll intend to modify the group settings.
You do this by clicking the "More" tab and after that clicking "Edit Group Settings":

Once on the edit page, you'll have numerous options to alter:

Items you can alter:.
- Group Name.
- Group Type.
- Description.
- Tags.
- Locations.
- Linked Pages.
- Privacy Settings.
- Membership Approval-- Do you want to let any person add participants or should just you have the ability to?
- Set a Group Address-- Here you'll have a possibility to provide the Group a custom link in addition to an e-mail address where individuals might email the group straight.
- Change your Description.
- Change Posting Permissions-- Here you can decide so admins can post or if members can also.
- Post Approval-- You can call for that all blog posts be accepted by an admin before going online.
As soon as you're done as well as delighted with the setups, click "Save1".
Your Group is Ready to Go!
You've currently effectively developed a Facebook Group! Congrats!
Now you can post updates inside the Groups-- therefore can members (if you have actually allowed it).
A Couple Of Group Features to Mention.
Notices- As an admin you need to possibly turn the alerts on obtain all updates when any individual posts-- just in case somebody spams the Group & you wish to react promptly:.

Messages/Chat- One of the great things about Groups is you can initiate a group chat/message with either all members of a Group or select members.
This is particularly beneficial when you have a statement to make or need to swiftly work together on an item/issue.
Events- An attribute most likely not made use of usually enough in Groups is Events. Inside the Group you can develop events that just members can see & RSVP for.
Just click the "Events" tab to the left and afterwards "Develop Event" & the lightbox below will certainly pack to produce your occasion.
Files- Inside groups you can share files of any kind in addition to develop Files which group participants can add to & work together on.
Consider this as your own little work space within Facebook-- or probably a replacement for apps like Basecamp or Dropbox.
Final Ideas
Since you've read this message, hopefully you can now successfully develop a group by yourself.
On a future article I'll question whether you ought to have a Facebook Account, Page or a Group for your business... or possibly all of the above!